When and Why to Replace Your Boiler’s Pressure Gauge
A malfunctioning pressure gauge can turn your boiler into a ticking time bomb or leave you shivering in a cold house. Knowing when to perform a Boiler pressure gauge replacement is crucial for both safety and comfort, especially during the unforgiving Massachusetts winters.
Signs of a Faulty Boiler Pressure Gauge
We’ve seen countless boilers in Franklin, Medway, and Bellingham, and often, the first indicator of a problem is right on the gauge itself. Here are the common signs that your boiler’s pressure gauge might be giving up the ghost:
- Stuck Needle: If the needle on your gauge consistently points to the same number, regardless of whether the boiler is hot or cold, or if you’ve added water to the system, it’s a strong sign it’s stuck. This means you’re not getting real-time pressure readings, making your system a potential hazard.
- Inaccurate Readings: Sometimes the needle moves, but the numbers don’t make sense. Perhaps your boiler’s relief valve releases pressure at 30 PSI, but your gauge reads 10 PSI. Or, as one homeowner finded, their gauge read over 15 PSI while the actual system pressure was much lower. This discrepancy means you can’t trust what the gauge is telling you.
- Condensation Inside the Gauge: While some condensation can occur in cold weather when the boiler cycles frequently, especially if it’s a liquid-filled gauge, persistent condensation that obscures the reading often indicates a seal has failed or the gauge is compromised. If it doesn’t dissipate as the boiler warms up, it’s likely time for a replacement.
- Leaks from the Gauge: Any visible water dripping or seeping from around the gauge’s connection point is a clear sign of a leak. This isn’t just about losing water; it indicates a weakening seal that could lead to further damage or system inefficiency.
- Physical Damage: Cracks in the glass, a bent needle, or a visibly corroded connection point (like a corroded pinhole on the back) all point to a gauge that needs to be replaced.
Consequences of a Malfunctioning Boiler Pressure Gauge
Ignoring a faulty pressure gauge is like driving a car without a speedometer – dangerous and inefficient. The consequences can range from minor annoyances to severe safety hazards:
- No Heat or Inefficient Heating: If your gauge reads too low, you might not have enough pressure to circulate hot water through your radiators, leaving your home cold. Conversely, if the gauge is inaccurate and you unknowingly operate with insufficient pressure, your system will struggle to heat effectively.
- System Damage: Running a boiler with consistently low pressure can lead to air in the system, which causes corrosion and reduces efficiency. Too high a pressure, undetected by a faulty gauge, can stress components, leading to leaks, premature wear, and even rupture of pipes or the boiler itself.
- Dangerous Explosions: This is the most severe risk. As we know, basic physics dictates a direct relationship between temperature and pressure in a closed system. If a boiler’s pressure relief mechanisms, including the PT valve, fail to operate correctly due to unchecked pressure (which a faulty gauge won’t warn you about), the boiler can build up immense pressure. A water heater or boiler can build up more than 100,000 pounds of pressure before it explodes, with catastrophic results. While thankfully rare, the Dangers of Boiler and Water Heater Explosions are real.
- Increased Energy Bills: An inefficient boiler, often caused by incorrect pressure levels that go unnoticed, will consume more energy to achieve the desired heat, leading to higher utility costs.
Gauge Lifespan: How Long Do They Last?
The typical lifespan of a boiler pressure gauge can vary widely. While some robust gauges might last as long as the boiler itself (15-20 years), it’s not uncommon for them to fail much sooner. They operate in a harsh environment of heat, pressure fluctuations, and potential corrosion. We often see gauges in homes across Norwood, Medfield, and Wrentham that need replacing after 5-10 years, sometimes even less, due to the wear and tear of continuous operation. Unlike PT valves, which are often recommended for replacement every three years as a preventative measure, pressure gauges are usually replaced on an as-needed basis when signs of failure appear.
For more insights into maintaining your system, check out our guide on Common Boiler Issues and How to Prevent Them. Understanding how to interpret the readings on your gauge is also vital, as detailed in this resource: How to Read a Boiler Water Pressure Gauge.
Gearing Up: Tools, Materials, and Safety
Before diving into your Boiler pressure gauge replacement, preparation is key. Having the right tools, the correct replacement part, and a clear understanding of safety precautions will make the job smoother and safer.
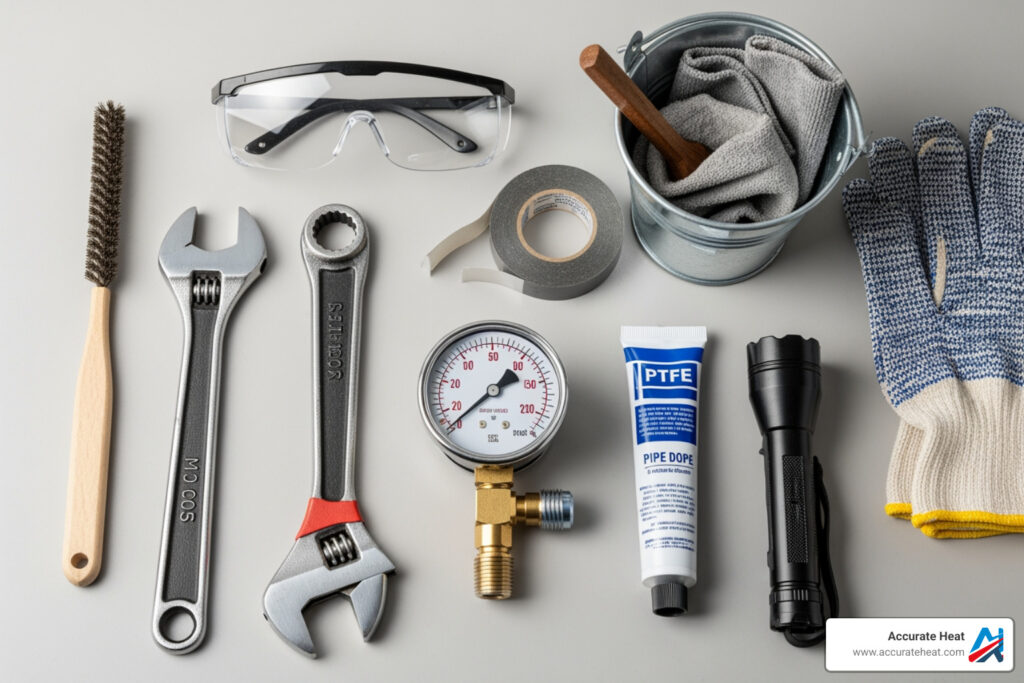
Tools and Materials You’ll Need
We believe in being prepared. Here’s a list of what you’ll typically need for a successful boiler pressure gauge replacement. You likely have most of these lying around your home in Holliston or Hopkinton!
- New Boiler Pressure Gauge: The correct replacement part (we’ll discuss how to choose this next).
- Adjustable Wrenches (2): Essential for loosening and tightening the gauge without damaging pipes. A pipe wrench or channel lock pliers can also work, but adjustable wrenches offer more control.
- Pipe Dope (Pipe Thread Sealant) or PTFE (Teflon) Tape: To ensure a watertight, leak-free seal on the threads. We recommend a few wraps of PTFE tape, followed by a thin layer of pipe dope for the best seal.
- Bucket or Container: To catch any residual water when removing the old gauge.
- Rags/Towels: For cleanup.
- Safety Glasses: Protect your eyes from water, debris, or unexpected pressure.
- Work Gloves: Protect your hands.
- Wire Brush (optional): To clean old threads if there’s corrosion.
- Flashlight or Headlamp: Boiler rooms can be dimly lit.
Choosing the Right Part for Your Boiler Pressure Gauge Replacement
Identifying the correct replacement gauge is crucial. A “one size fits all” approach rarely works with boiler components. When selecting a new gauge for your system in Foxboro or Newton, consider these factors:
- Type of Gauge:
- Analog Gauges: These are the most common, featuring a needle and a dial. They are reliable and easy to read. Many also include a thermometer.
- Digital Gauges: Offer precise digital readouts but are less common for residential boilers and typically require battery power.
- Liquid-Filled Gauges: Often filled with glycerin, these gauges are more durable and provide more stable readings in vibrating environments, common in boiler rooms. The liquid dampens the needle’s movement, extending the gauge’s lifespan.
- Tridicators (Combination Gauges): These gauges, like the MEANLIN MEASURE 0-160Psi Thermal Pressure Gauge or the Peerless 51324, measure both pressure (PSI/Bar) and temperature (°F/°C) on a single dial. Many residential boilers use tridicators.
| Gauge Type | Description | Pros | Cons |
|---|---|---|---|
| Analog | Traditional dial with a needle. | Reliable, no power needed, easy to read. | Can be affected by vibration, less precise. |
| Digital | Electronic display. | Highly accurate, easy to read. | Requires battery/power, more expensive. |
| Liquid-Filled | Analog gauge filled with glycerin. | Durable, stable readings (reduces needle flutter). | Can be more expensive, liquid can leak/discolor. |
| Tridicator | Combines pressure and temperature readings on one dial. | Space-saving, convenient for monitoring both parameters. | Can be harder to read both simultaneously, more complex. |
- Pressure Range (PSI/Bar): Check your old gauge or your boiler’s manual for the correct operating pressure range. Most residential boilers operate between 12-15 PSI (cold) and typically have a gauge with a maximum reading of 30-75 PSI. For example, the Weil-McLain 510218097 has a pressure range of 0–75 psig.
- Temperature Range (°F/°C): If you’re replacing a tridicator, ensure the new gauge has the appropriate temperature range for your boiler, typically 60°F to 320°F.
- Dial Size: This refers to the diameter of the gauge face. Common sizes are 2.5 inches, 3 inches, or 4 inches. Match the size of your old gauge for proper fit and visibility.
- Connection Type (NPT): The most common connection type for boiler gauges is NPT (National Pipe Taper) thread. The size is critical, usually 1/4 inch NPT or 1/2 inch NPT. Look for this on your old gauge or in the boiler’s specifications.
- Mount Type:
- Lower Mount (Bottom Mount): The connection stem is at the bottom of the gauge.
- Back Mount: The connection stem is at the back of the gauge.
- Center Back Mount: The connection is in the center of the back.
Match the mounting type to your existing setup to ensure it fits and is readable.
Always refer to your boiler’s manufacturer specifications or manual to ensure you purchase the correct replacement. If in doubt, take a photo of your existing gauge and its connection to your local plumbing supply store or contact us for assistance. For more guidance on boiler components, refer to our Choosing the Right Boiler: A Complete Buying Guide.
Key Safety Precautions for Boiler Pressure Gauge Replacement
Safety is paramount when working on any heating system. We cannot stress this enough. Before you touch anything, follow these critical steps:
- Turn Off Power to the Boiler: Locate the circuit breaker that controls your boiler and switch it to the “OFF” position. This prevents the boiler from accidentally firing up during the replacement process.
- Allow the System to Cool Completely: Boilers operate at high temperatures. Hot water or steam can cause severe burns. Give your boiler ample time to cool down – several hours, or even overnight, is best.
- Depressurize the Boiler: This is crucial.
- Locate the boiler’s main water supply valve and turn it off.
- Attach a hose to the boiler’s drain valve (usually located at the bottom).
- Run the hose to a floor drain or a large bucket.
- Open the drain valve and allow water to flow out until the pressure gauge reads zero (or as close to it as possible, ideally around 5 PSI). You may need to open a bleed valve on a radiator to help release pressure.
- Important: If your old gauge is completely stuck, you’ll have to rely on draining a significant amount of water from the system to ensure depressurization.
- Isolate the Water Supply: Ensure the main water supply to the boiler is completely shut off.
- Wear Personal Protective Equipment (PPE): Always wear safety glasses to protect your eyes from water, rust, or debris. Work gloves will protect your hands.
If you’re ever unsure about any of these steps, or if you encounter unexpected issues like a drain valve that won’t open, it’s always best to stop and call a qualified professional.
Your Step-by-Step Guide to Boiler Pressure Gauge Replacement
With safety precautions in mind and your tools ready, let’s walk through the Boiler pressure gauge replacement process. We recommend following the “dry process” for safety, which involves draining the boiler.
Step 1: Power Down and Depressurize the System
This step is a repeat of our safety precautions, but it’s so important we’re including it again in the step-by-step:
- Shut off the boiler circuit breaker: This cuts electrical power to the unit.
- Close the water feed valve: This prevents new water from entering the boiler.
- Allow the boiler to cool down: This is critical to avoid burns.
- Attach a hose to the boiler’s drain valve: Direct the hose to a suitable drain or a large bucket.
- Open the drain valve: Let the water drain out. As water leaves the system, the pressure will drop. You might need to open bleed valves on your radiators, starting from the highest point in your home (e.g., a fourth-floor radiator in Quincy or Weymouth) to help release air and allow water to drain effectively. Continue draining until the boiler pressure gauge reads as close to zero PSI as possible.
Step 2: Remove the Old Gauge
Now that the system is depressurized and cooled, we can remove the faulty gauge.
- Place a bucket or rags underneath the gauge: Even with depressurization, some residual water might drip out.
- Use two adjustable wrenches: This is a pro tip! Use one wrench to hold the pipe or fitting that the gauge is screwed into. Use the second wrench to turn the gauge itself counter-clockwise. This “counter-torque” method prevents you from twisting and potentially damaging other pipes or fittings in your boiler system.
- Unscrew the old gauge: Carefully turn the gauge counter-clockwise until it comes free. Be prepared for a small amount of water to escape.
- Inspect the opening: Once the old gauge is out, quickly check the female threads in the boiler connection for any debris or blockage. If you suspect it’s plugged (which can happen with rust), you might need to gently clear it with a thin wire, but be careful not to push anything further into the boiler.

Step 3: Prepare and Install the New Gauge
With the old gauge removed, it’s time for the new one.
- Clean the boiler’s female threads: Use a wire brush if there’s any visible rust or old sealant residue. Ensure the threads are clean for a good seal.
- Apply pipe dope or PTFE tape to the new gauge’s threads: We recommend wrapping PTFE tape (Teflon tape) clockwise around the male threads of the new gauge, typically 3-5 wraps. Then, for an extra secure seal, apply a thin layer of pipe dope over the tape. This combination helps create a strong, leak-free connection.
- Hand-tighten the new gauge: Carefully thread the new gauge into the boiler’s opening. Turn it clockwise by hand until it’s snug. Be careful not to cross-thread it.
- Use a wrench for the final turns: Once hand-tight, use an adjustable wrench to carefully tighten the gauge. Turn it about 1/2 to 3/4 of a turn past hand-tight, or until it feels snug and the face of the gauge is oriented correctly for easy reading. Avoid over-tightening, as this can damage the threads or the gauge itself.

Step 4: Repressurize and Check for Leaks
The moment of truth! Now we’ll bring the system back up to pressure.
- Slowly open the water feed valve: Gradually open the main water supply valve to the boiler. You’ll hear water flowing back into the system.
- Watch the pressure rise: Monitor the new pressure gauge. For most residential hot water boilers, the cold pressure should settle between 12-15 PSI. If you have a multi-story home, particularly in areas like Dedham or Wellesley where homes can be quite tall, you might need slightly higher pressure to ensure water reaches the highest radiators. For example, a system with radiators 45 feet above the boiler might need at least 20 PSI, possibly up to 27 PSI, to overcome the static head pressure.
- Bleed air from radiators (if needed): As the system refills, air can get trapped. Go to each radiator, starting from the lowest and working your way up, and use a radiator key to open the bleed valve until water comes out steadily, indicating all air has been expelled.
- Check for leaks around the new gauge connection: Visually inspect the area where the new gauge connects to the boiler. Look for any drips or moisture. If you see a leak, try to gently tighten the gauge a little more with your wrench. If the leak persists after a slight tightening, you may need to repeat Step 3, ensuring proper thread sealant application.
Final Checks: Testing and Monitoring Your New Gauge
You’re almost there! Once the system is refilled and repressurized, it’s time to put your boiler back into action and confirm your Boiler pressure gauge replacement was a success.
- Restore power to the boiler: Flip the circuit breaker back to the “ON” position.
- Turn the system on: Set your thermostat to call for heat.
- Monitor the pressure as the boiler heats up: As the boiler heats the water, the pressure will naturally increase due to thermal expansion. This is normal. Your expansion tank should absorb this excess pressure. The pressure should typically stay below 30 PSI when hot. If it consistently climbs above 30 PSI and the relief valve starts to drip, it could indicate an issue with your expansion tank or pressure-reducing valve.
- Bleed air from radiators if necessary: After the system has run for a bit, you might hear gurgling sounds from your radiators, indicating trapped air. If so, repeat the radiator bleeding process. Air in the system can lead to cold spots and reduced efficiency.
- Confirm the gauge reading stays within the normal operating range: Once the system is fully heated and running, ensure the pressure reading remains stable and within the manufacturer’s recommended range, usually indicated by a green zone on the gauge.
Your new gauge should now provide accurate readings, giving you peace of mind and allowing you to monitor your boiler’s health effectively. Regular monitoring of your boiler’s pressure is a key part of good boiler maintenance. For more tips on keeping your system in top shape, check out our guide on How to Care for Your Boiler.
Frequently Asked Questions about Boiler Gauges
We hear a lot of questions about boiler gauges from homeowners across Mansfield, Walpole, and Canton. Here are some common ones:
Why does my boiler gauge have two needles?
Many boiler gauges, especially tridicators, feature two needles: a black one and a red one.
- Black Needle: This is the primary indicator, showing the current pressure (and often temperature) in your boiler system.
- Red Needle: This is a manual marker that you can physically adjust. It serves as a visual reminder or indicator for a maximum or recommended pressure level. For example, you might set the red needle to the maximum operating pressure for your boiler, or to the ideal cold fill pressure, so you can easily see if the black needle strays from that point. This can be particularly useful in multi-story homes where a specific pressure might be needed to reach upper floors, as the red needle can be set to account for elevation variations.
Can a boiler pressure gauge be repaired?
In most cases, no. While the internal mechanisms of a pressure gauge are intricate, the cost-effectiveness of repairing a faulty boiler pressure gauge is generally very low. The labor involved in diagnosing and fixing a tiny internal component, recalibrating it, and then reinstalling it typically far outweighs the cost of a new replacement gauge, which can be found for as little as $15-$60. Therefore, replacement is the standard and most practical practice when a boiler pressure gauge malfunctions.
What pressure should my boiler be when it’s cold?
For most residential hot water boilers in our service areas like Stoughton and Sharon, the recommended cold pressure (when the boiler has been off and cooled down) is typically between 12-15 PSI. This provides enough pressure to push water to the highest points in a standard two-story home.
However, for multi-story homes (three stories or more), particularly if you have radiators on upper floors (e.g., 45 feet above the boiler), you might need a slightly higher cold pressure to ensure adequate circulation and prevent air pockets. In such cases, the recommended cold pressure could be closer to 20-27 PSI. Always check your boiler’s manufacturer specifications or manual for the precise recommended cold fill pressure for your specific model and home configuration.
Conclusion: Keep Your Boiler in Peak Condition
Successfully completing a Boiler pressure gauge replacement can be a rewarding DIY project, giving you a deeper understanding of your heating system and the satisfaction of a job well done. It’s a testament to the fact that with proper guidance and careful attention to detail, homeowners can tackle essential maintenance tasks.
However, we always emphasize the paramount importance of safety. Working with boilers involves high temperatures, pressure, and electricity. If you’re ever unsure about a step, uncomfortable with the process, or if your boiler presents unusual challenges (like stubborn fittings, advanced wiring, or complex system configurations), recognizing when a job is too complex for DIY is the smartest decision you can make. Your safety and the integrity of your heating system are always our top priorities.
For professional and reliable boiler services, including expert Boiler pressure gauge replacement, in Franklin and throughout Massachusetts, trust the experts at Accurate Heat. With over 30 years of experience, we provide honest, timely, and expert solutions to keep your home warm and safe. Don’t hesitate to reach out to us for any of your boiler needs.