What Does a 2 Ton Mini Split Installation Actually Cost?
2 ton mini split installation is one of the most cost-effective ways to heat and cool a medium-sized home — but prices vary widely depending on your setup.
Here’s a quick overview of what Massachusetts homeowners typically need to know:
| Factor | Details |
|---|---|
| Cooling capacity | 24,000 BTUs per hour |
| Suitable area | 900 to 1,200 square feet |
| System types | Single-zone or multi-zone; wall-mounted, cassette, or ducted |
| Installation cost range (2026) | $2,000 to $10,500 depending on zones, labor, and equipment |
| DIY vs. professional | Professional installation strongly recommended |
If you’re a Massachusetts homeowner trying to figure out what a 2 ton mini split will actually cost you — you’re in the right place.
The price range is wide. A basic single-zone wall-mounted system costs far less than a multi-zone cassette setup with complex wiring and refrigerant runs. And in Massachusetts, labor rates, permit requirements, and harsh winter conditions all play a role.
Beyond cost, there’s a lot to get right. Unlike traditional central AC, mini splits skip the ductwork — which eliminates the 20-30% energy loss that leaky ducts cause. But the installation still involves refrigerant handling, electrical wiring, and precise sizing. Get it wrong and you’ll pay for it in efficiency losses, voided warranties, or early system failure.
This guide breaks down every cost factor so you can plan with confidence.

Quick 2 ton mini split installation terms:
Factors Influencing 2 Ton Mini Split Installation Costs
When we talk about a “2 ton” system, we are referring to its cooling capacity. In the HVAC world, one ton equals 12,000 BTUs (British Thermal Units) per hour. Therefore, a 2 ton system provides 24,000 BTUs. This is generally the “sweet spot” for medium-sized living areas, master suites, or open-concept first floors in Massachusetts homes.
However, the sticker price of the unit is only one part of the equation. Several variables dictate the final investment.
SEER2 Ratings and Efficiency
In 2026, energy efficiency is more than just a buzzword; it’s a regulatory standard. The SEER2 (Seasonal Energy Efficiency Ratio 2) rating measures how much cooling the system puts out for every unit of energy it consumes. Higher SEER2 ratings mean lower monthly utility bills, but the initial equipment cost is higher. Because mini splits avoid the 20-30% energy loss associated with ductwork leaks, even a mid-range 2 ton unit is often significantly more efficient than a traditional central air split system.
Equipment Brands and Technology
Not all 2 ton units are created equal. Premium brands often feature advanced inverter technology, which allows the compressor to speed up or slow down rather than simply switching on and off. This provides more consistent temperatures and quieter operation—usually under 70 dB(A), which is quieter than a normal conversation.
Labor and Local Trends
In areas like Franklin, Medfield, and Norfolk, MA, labor rates reflect the high level of expertise required for a code-compliant installation. By 2026, we see a trend toward more integrated “smart” homes, which may require additional labor for Wi-Fi configuration and advanced thermostat integration.

Multi-Zone vs. Single-Zone
A 2 ton outdoor condenser can be paired with a single 24,000 BTU indoor head (single-zone) or multiple smaller indoor units (multi-zone) that total 24,000 BTUs. For example, you might have one 12,000 BTU unit in the living room and two 6,000 BTU units in bedrooms. Multi-zone systems are more complex to install because they require multiple refrigerant linesets and electrical connections, driving up the labor cost.
| Installation Complexity | Configuration | Estimated Scope |
|---|---|---|
| Basic | Single-zone wall mount | “Back-to-back” install with short lineset |
| Moderate | Multi-zone (2-3 heads) | Longer refrigerant runs, some concealed piping |
| Complex | Ceiling cassettes/Ducted | Requires attic access, structural mods, and drainage pumps |
Choosing the Right 2 Ton Mini Split Installation Type
The “look” and “feel” of your system depend on the indoor unit type you choose. We often help homeowners in towns like Wrentham and Holliston decide between these popular options:
- Wall-Mounted Units: The most common and cost-effective. They sit high on a wall and provide excellent airflow.
- Ceiling Cassettes: These sit flush with the ceiling. They are aesthetically pleasing but require space in the joists and more intensive labor.
- Floor Consoles: Ideal for rooms with low ceilings or where wall space is limited (like an attic with slanted walls).
- Ducted Units: These are small air handlers hidden in a closet or attic that use a minimal amount of ductwork to cool one or two rooms.
Choosing the right type involves more than just aesthetics. You must consider ductless mini split AC systems based on the BTU sizing for your specific room layout. A 2 ton system is typically rated for 900 to 1,200 square feet, but poor insulation or large south-facing windows in a Bellingham home might mean you need that full capacity for a slightly smaller space to ensure comfort during a Massachusetts heatwave.
Professional vs. DIY 2 Ton Mini Split Installation Risks
It is tempting to look at a DIY kit and think, “How hard can it be?” While some systems come “pre-charged,” the risks of a self-install often outweigh the savings.
1. Refrigerant Handling and Vacuuming Properly handling refrigerant like R-410A or R32 requires specialized tools. A critical step is using a vacuum pump to remove air and moisture from the lines. Professionals aim for a vacuum of 500 microns or below. If moisture remains in the lines, it can mix with the system’s oil to create acid, which will eventually eat the compressor from the inside out.
2. Electrical Hazards A 2 ton system typically requires a dedicated 208/230V circuit. Working with high-voltage electricity without proper training is dangerous and can lead to fire hazards or equipment damage. Local codes in Massachusetts are strict about how these units are wired and grounded.
3. Warranty Protection Most manufacturers, including Mitsubishi Electric, require professional installation to honor the warranty. If you install it yourself and a part fails, you may find yourself paying full price for repairs. Following installation manuals is a complex task that involves torque specifications and leak testing that most homeowners aren’t equipped for.
Before you buy a kit, check out these tips for hiring a ductless heat installer to see what a pro brings to the table.
Step-by-Step Guide to a Successful Installation
When we arrive at a home in Foxboro or Newton for a 2 ton mini split installation, we follow a rigorous process to ensure the system runs at peak efficiency for decades.
Site Selection and Preparation
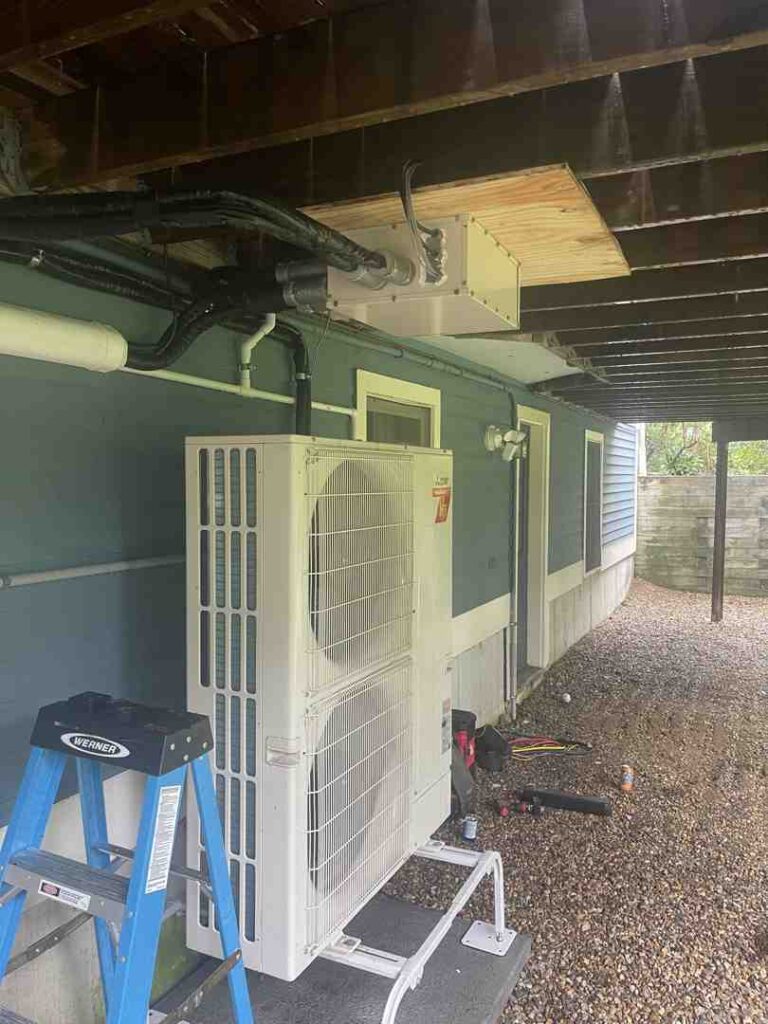
The indoor unit must be placed on an exterior wall whenever possible to simplify drainage. It needs at least 6 inches of clearance from the ceiling to allow for proper return airflow and filter access. The outdoor unit needs a level, stable base—either a plastic pad on a gravel bed or a wall-mounted bracket to keep it above the snow line.
Mounting and Drilling
We use a template to mark the mounting bracket location, ensuring it is perfectly level. Then comes the “point of no return”: drilling a 3-inch hole through your wall. This hole must be pitched slightly downward toward the outside to allow condensate water to drain via gravity.
Lineset and Drainage
The “lineset” consists of two copper pipes (suction and liquid lines), a communication cable, and a drain hose. These are bundled together, passed through the wall hole, and connected to both units. We use high-quality insulation to prevent energy loss and “sweating” (condensation) inside your walls.
System Testing
Once connected, we perform a nitrogen pressure test to check for leaks. After confirming the system is airtight, we pull a vacuum to 500 microns. Only then do we release the refrigerant into the lines. We finish by checking the “delta T”—the temperature difference between the air entering and leaving the unit—to ensure it’s cooling exactly as it should.
Preparing Your Home for a 24,000 BTU System
A successful installation starts long before we drill the first hole. We perform a “Manual J” load calculation to ensure a 2 ton system is actually what you need.
- Insulation Quality: If your attic in Hopkinton is under-insulated, a 24,000 BTU unit might struggle to keep up.
- Electrical Requirements: Most 2 ton systems require a 20-amp or 30-amp dedicated circuit. If your electrical panel is full, we may need to install a sub-panel.
- Permits: In Massachusetts, you generally need both an electrical permit and a mechanical/gas permit (depending on the system type). As mini split system heat pump installers in Franklin, MA, we handle the paperwork to ensure everything is above board.
Handling Refrigerant Lines and Electrical Wiring
Handling the “guts” of the system requires precision. For example, R-410A operates at pressures 1.6 times higher than older refrigerants. This means every “flare” connection (where the copper pipe meets the unit) must be perfect. We use a specialized torque wrench to tighten flare nuts to specific Newton-meters (N•m) to prevent slow leaks that could take months to show up.
We also pay close attention to the refrigerant handling and labeling requirements. In 2026, systems using R32 refrigerant have specific safety protocols because it is mildly flammable. Proper labeling of the total refrigerant charge (in kg and CO2 equivalent) is not just a best practice—it’s often a legal requirement.
If the indoor unit cannot drain by gravity (for example, if it’s on an interior wall), we install a condensate pump. These small, quiet pumps push the water up into the ceiling or over to a distant drain point.
Maximizing Longevity Through Proper Maintenance
Once your 2 ton mini split installation is complete, a little care goes a long way. These systems are incredibly reliable, but they aren’t “set it and forget it.”
- Filter Cleaning: You should check your indoor filters every 2-4 weeks. If they get clogged, airflow drops, efficiency plummets, and the coil can actually freeze over.
- Outdoor Clearance: Keep leaves, tall grass, and snow away from the outdoor condenser. It needs to “breathe” to move heat effectively. In snowy towns like Walpole or Canton, we recommend a “snow hat” or elevating the unit 12-18 inches off the ground.
- Annual Service: Once a year, have a pro like us come out to deep-clean the coils and check the refrigerant pressures. A clean system lasts years longer than a neglected one.
Conclusion and Next Steps for Massachusetts Homeowners
A 2 ton mini split installation is a significant upgrade to your home’s comfort and value. While the average cost in 2026 ranges from $2,000 to $10,500, the exact price depends on your home’s unique layout and your choice of technology.
At Accurate Baker Elman, we bring over 30 years of experience to every job. As a Mitsubishi Electric Elite Diamond Contractor, we don’t just “slap units on walls”—we design comfort solutions tailored to the Massachusetts climate. Whether you’re in Franklin, Quincy, or anywhere in between, we ensure your system is sized correctly, installed safely, and backed by the best warranties in the business.
Ready to stop sweating through the summer and start saving on your energy bills? Schedule your ductless mini split AC system consultation with our team today, and let’s find the perfect 2 ton solution for your home.