Why Utility Sink Plumbing Matters for Your Home
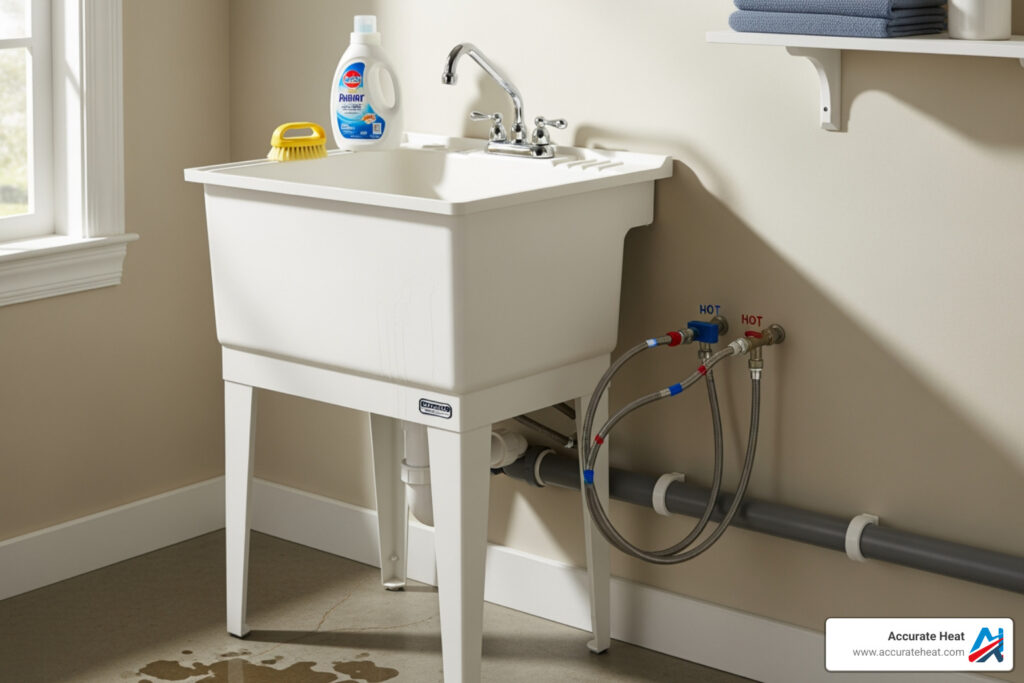
Utility sink plumbing is a practical home improvement project that adds convenience to laundry rooms, garages, basements, and workshops. Whether you’re hand-washing delicate clothes, cleaning paint brushes, rinsing muddy boots, or filling mop buckets, a utility sink handles the messy tasks you’d rather keep out of your kitchen or bathroom.
Quick Answer: Installing Utility Sink Plumbing
- Choose your sink – Select freestanding, wall-mount, drop-in, or undermount based on your space
- Connect to drain – Install a P-trap and connect to existing drain line with proper venting
- Run supply lines – Tap into hot and cold water lines using tee fittings
- Test thoroughly – Check all connections for leaks before regular use
Typical Cost: $200-$500 for materials
Time Required: 4-6 hours for standard installation
Skill Level: Intermediate plumbing skills needed
The key to successful utility sink plumbing lies in three critical areas: proper drainage (including a vented P-trap to prevent sewer gas), secure water supply connections, and compliance with local plumbing codes. Massachusetts homeowners should note that S-traps are prohibited by state plumbing code—only P-traps with proper venting are allowed.
This guide walks you through the complete process, from selecting the right sink and location to making watertight connections. We’ll cover the essential tools, materials, and techniques you need, while highlighting when it’s smart to call a professional.
For Massachusetts homeowners dealing with harsh winters and older homes, a properly installed utility sink can be a game-changer. Just remember: if you’re working with frozen pipes, unheated garages, or complex drainage situations, professional help ensures the job meets code and protects your home.
Pre-Installation: Planning Your Project
Before starting your utility sink plumbing project, careful planning is essential. Considering your needs, space, and existing plumbing will save you headaches later. First, measure the available space for both the sink and for you to work comfortably. Then, assess your existing plumbing to locate hot and cold water lines and a nearby drainpipe. This assessment will guide your sink choice and determine the installation’s complexity.

Choosing the Right Sink: Types, Materials, and Terminology
A utility sink is a large, deep basin designed for tasks too messy for a regular kitchen or bathroom sink. A utility tub is often a larger, freestanding plastic unit, while a laundry sink is geared toward laundry tasks. For this guide, we’ll use “utility sink” as a broad term encompassing these variations.
Utility sinks come in several installation types:
- Freestanding: Flexible and easy to install, these have legs and can be placed almost anywhere with plumbing access.
- Wall-Mount: Ideal for saving floor space, these are mounted directly to a sturdy wall.
- Drop-In (Top-Mount): These are dropped into a countertop opening, with the rim resting on the counter.
- Undermount: Installed beneath the countertop for a seamless look, requiring a solid surface countertop for support.
Now, let’s consider the materials commonly used for utility sinks:
| Material | Durability & Resistance | Cost | Maintenance | Common Uses |
|---|---|---|---|---|
| Stainless Steel | Highly durable, corrosion-resistant, heat & stain-resistant | Moderate to High | Easy to clean, can show water spots | Laundry rooms, garages, commercial settings |
| Polypropylene | Lightweight, budget-friendly, resistant to rust & dents | Low | Easy to clean, can scratch or stain over time | Laundry rooms, garages, basements |
| ABS Plastic | Similar to polypropylene, lightweight, budget-friendly | Low | Easy to clean, can scratch or stain | Laundry rooms, garages, basements |
| Cast Iron | Very durable, heavy, traditional look, enamel coating | High | Requires care to prevent chipping enamel, heavy to install | Vintage-style laundry rooms, workshops |
| Composite | Resilient, stone-like appearance, scratch & chip resistant | Moderate | Easy to clean with soap and water, resistant to fading | Modern laundry rooms, workshops |
For example, a durable stainless steel sink is great for a laundry room, while a budget-friendly polypropylene sink is suitable for a garage.
Selecting the Perfect Location
Choosing the right spot for our utility sink is about optimizing functionality and minimizing installation complexities.
Here are our main considerations:
- Proximity to Existing Plumbing: The closer the sink is to existing hot/cold water lines and a drainpipe, the simpler and less expensive the installation will be.
- Water-Resistant Flooring: Choose a location with concrete, tile, or vinyl flooring. For wood floors, consider adding waterproofing or a drip pan.
- Adequate Space: Ensure there’s enough room to use the sink comfortably, including overhead clearance for the faucet.
- Electrical Access: A nearby GFCI-protected outlet is essential for safety if you plan to use appliances.
- Common Locations: Basements, garages, laundry rooms, and mudrooms are all excellent choices.
For more insights into optimizing plumbing in various areas of your home, you can Learn more about kitchen & bathroom plumbing services from Accurate Heat.
Essential Tools and Materials for Utility Sink Plumbing
Having the right tools and materials ensures efficiency, safety, and a professional finish.
Here’s what we’ll typically need:
Essential Tools:
- Adjustable wrench
- Tubing cutter
[PVC pipe saw](https://amzn.to/3oJOoT0) - PVC pipe saw
- Level
- Drill/driver
[Drill/driver](https://amzn.to/3FwLo3t) - Hammer
[Hammer](https://amzn.to/3kHxhQN) - Safety glasses
[Safety glasses](https://amzn.to/3coDxIz) - Bucket
- Pliers (slip-joint and channel-lock)
- Plumber’s putty knife
- Emery cloth
- Propane torch (for soldering copper)
[Propane torch](https://amzn.to/3wXuGap)
Essential Materials:
- Utility Sink and Faucet
- P-trap assembly
- Flexible supply lines
- PVC pipes and fittings (Wye-fitting, sanitary tee, elbows)
- PVC primer and cement
- Plumber’s putty and Silicone caulk
- Teflon tape (PTFE thread seal tape)
- Shutoff valves (hot and cold)
- Copper or PEX pipes and fittings
- Copper wall anchors
- Solder and flux (for copper)
The average cost for a DIY utility sink installation, including materials, is $200 to $500. A standard installation takes about 4 to 6 hours. Complex jobs without existing plumbing will cost more and take longer.
For more detailed cost information and to inquire about our services, please reach out. Cost information in this article sourced from industry averages and Accurate Heat’s experience.
The Core of Utility Sink Plumbing: Drain and Vent Installation
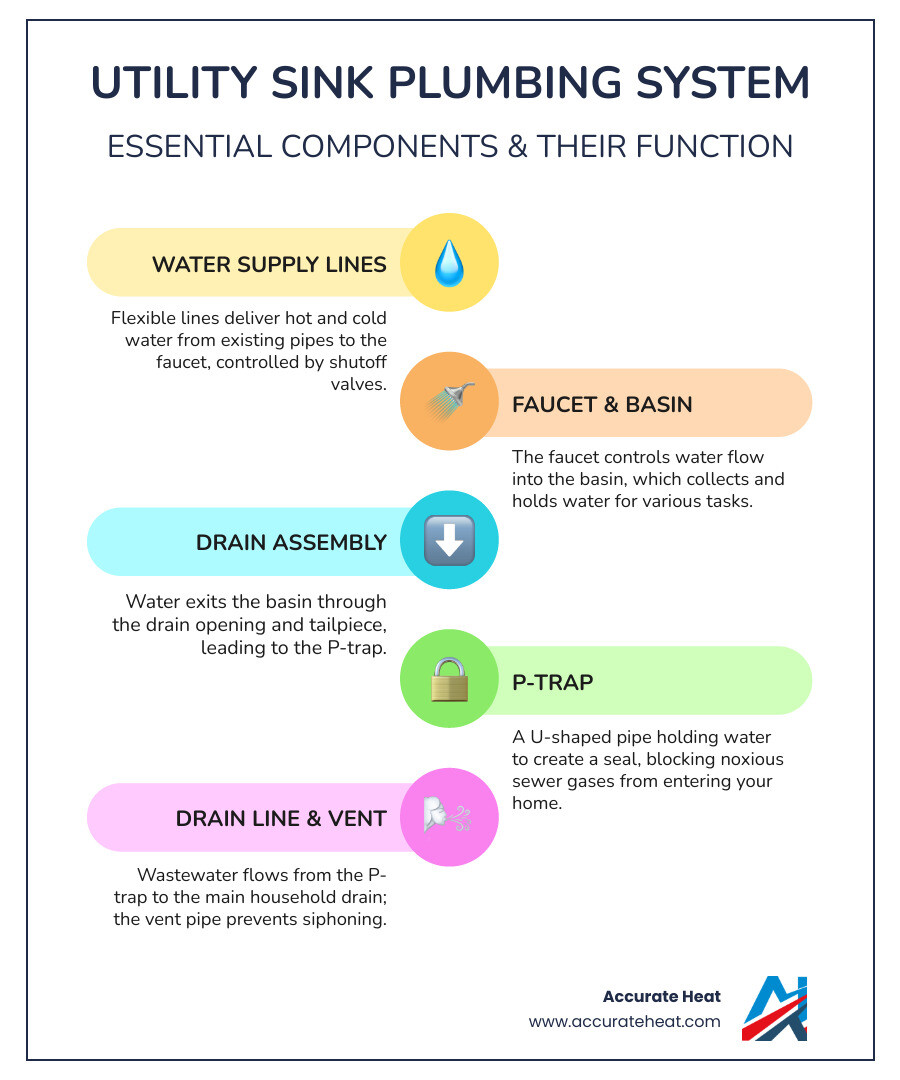
A proper drain and vent system is crucial for a functional and safe utility sink plumbing installation. It carries wastewater away while preventing sewer gas from entering your home, making it a critical part of the project.

Our goal here is to create a system that efficiently carries wastewater away while preventing sewer gases from entering our living space and ensuring smooth drainage.
Understanding Vents, P-Traps, and Plumbing Codes
Let’s get down to the nitty-gritty of drainage, starting with vents and P-traps.
Why Venting is Crucial:
A vent pipe allows air into the drainage system, preventing a vacuum from forming that would otherwise siphon water out of the P-trap. Without proper venting, you’ll experience slow drainage, gurgling noises, and hazardous sewer gas escaping into your home.
P-Traps vs. S-Traps:
The P-trap is the U-shaped pipe under the sink that holds a water seal to block sewer gas. Older S-traps were prone to siphoning this water seal away, leaving an open path for gas. For this reason, S-traps are strictly prohibited by many plumbing codes, including in Massachusetts. If your home in an area like Franklin or Norfolk has an S-trap, it’s a code violation and must be replaced with a properly vented P-trap. You can review the official Massachusetts plumbing codes for more details.
Air Admittance Valves (AAVs):
If connecting to a main vent stack isn’t feasible, an Air Admittance Valve (AAV) can be an alternative. This one-way valve opens to let air into the drainpipe, preventing siphoning, but closes to block sewer gas. Since local codes on their use vary, always check with your plumbing inspector in towns like Newton or Waltham before installing an AAV.
Step-by-Step: Connecting to an Existing Drain Line
Connecting to an existing drain line requires precision and proper plumbing practices.
- Safety First: Turn Off Water: Shut off the main water supply to your home. Open a faucet at the lowest point to drain remaining water from the lines.
- Locate Main Drain Stack: Identify a suitable section of the main drain or a branch drain line (often a 4-inch PVC pipe in basements) where you can tie in.
- Measure and Mark: Mark the section of the PVC drainpipe for your new Wye-fitting or sanitary tee. Horizontal drain lines require a minimum slope of 1/4 inch per foot.
- Cut into PVC Drain Pipe: Using a PVC pipe saw, carefully cut out the marked section. Keep a bucket handy for any residual water.
- Install a Wye-Fitting or Sanitary Tee: Install the fitting into the cut section. Use a Wye-fitting for horizontal connections and a sanitary tee for vertical ones. Ensure it’s oriented to direct wastewater downward.
- Dry-Fit the New Drain Arm: Before gluing, assemble the new drain arm (the pipe from the fitting to the P-trap connection). This lets you check alignment, ensure the 1/4-inch per foot slope, and make final cuts.
- Glue Connections with PVC Primer and Cement: Disassemble the dry-fit pieces. Apply PVC primer, then cement, to both the pipe and fitting. Quickly join the pieces with a quarter-turn twist and hold firmly for 30 seconds.
- Ensure Proper Slope: Double-check that your new drain arm maintains the necessary 1/4-inch per foot slope to prevent standing water and clogs.
Step-by-Step Installation: Assembling Your Sink
With the drain line ready, it’s time to bring our utility sink to life. This phase involves putting together the sink unit itself, installing the faucet, and connecting the P-trap to our newly prepared drain system.
Assembling the Sink and Installing the Faucet
- Assemble Sink Legs or Cabinet Base: Following the manufacturer’s instructions, assemble the sink’s legs or cabinet base, ensuring all components are secure.
- Punch Out Faucet Holes (if applicable): Many plastic sinks have pre-marked faucet holes. To punch them out, place a flat-head screwdriver on the mark and tap it gently with a hammer.
- Level the Sink: Position the sink and use a level, adjusting the leg levelers or using shims until the sink is perfectly level from front to back and side to side.
- Position for Drain Alignment: Make sure the sink’s drain opening is correctly aligned with the drain arm where the P-trap will connect.
- Install the Faucet:
- Apply a ring of plumber’s putty or use the provided gasket on the faucet’s base.
- Insert the faucet through the holes in the sink deck and secure it from underneath with the mounting nuts.
- Wipe away any excess plumber’s putty. If your faucet has a sprayer, connect the hose and attach the weight underneath.
- Connect the P-Trap Assembly:
- Assemble the P-trap kit. Connect the sink’s tailpiece to the P-trap, and then connect the P-trap’s horizontal arm to the drain arm using slip nuts and washers.
- Hand-tighten all connections, then give them a final quarter-turn with a wrench for a secure seal.
Connecting the Hot and Cold Water Supply Lines
Now for the water supply! This is where careful planning pays off.
- Shut Off Main Water Supply: As always, turn off the main water supply to your house and open a lower faucet to relieve pressure in the pipes.
- Tap into Existing Hot and Cold Water Lines:
- Locate nearby hot and cold supply pipes (usually 1/2-inch copper or PEX). Use a tubing cutter to cut the pipes and install tee fittings.
- For copper, this requires cleaning, fluxing, and soldering. For PEX, use appropriate crimp or push-fit fittings.
- Important: If you’re not comfortable with soldering or working with older pipes, this is a good time to call a professional plumber from Accurate Heat.
- Run New Lines to the Sink Location with Shutoff Valves:
- From the tee fittings, run new copper or PEX lines to the area under the sink. Install quarter-turn shutoff valves on both lines for easy maintenance.
- Secure the new pipes to wall studs or joists with clamps to prevent movement.
- Connect Flexible Supply Hoses from Shutoff Valves to Faucet:
- Connect the flexible supply hoses from your faucet to the hot and cold shutoff valves (hot to hot, cold to cold).
- Apply Teflon tape to the valve threads if they aren’t compression fittings.
- Hand-tighten the connections, then use a wrench to snug them up, being careful not to overtighten.
Regular maintenance of our home’s plumbing system, including these new connections, is key to preventing problems. To learn more about this, explore Why Regular Plumbing Maintenance Is a Must in Massachusetts.
Finishing Touches and Advanced Scenarios
We’re almost there! With our sink assembled and connections made, it’s time for the final checks, sealing, and a look at some trickier installations and useful accessories.
Testing for Leaks and Adding Finishing Touches
This is the moment of truth! We need to carefully test our utility sink plumbing to ensure everything is watertight.
- Turn Water On Slowly at the Main: Go back to our main water shutoff valve and slowly turn the water back on. Listen for any unusual sounds and immediately check for obvious leaks at all our new connections.
- Open Sink Faucets: Once the main water is on, slowly open both the hot and cold water faucets on our utility sink. Let the water run for a few minutes. This allows air to escape from the lines and helps us check for proper flow.
- Check All Connections for Leaks: With water flowing, carefully inspect every single connection we made – from the water supply lines to the faucet, to the P-trap, and all the way to the main drain line. Look for drips, moisture, or any signs of leaks.
- Tighten Compression Nuts as Needed: If we find any drips, gently tighten the corresponding compression nut or fitting with our adjustable wrench. Don’t overtighten, but apply enough pressure to stop the leak. Repeat the water test if adjustments were made.
- Apply Silicone Caulk: Once we’re confident there are no leaks, we’ll apply a bead of high-quality silicone caulk (designed for wet areas) around the edges where the sink meets any walls or countertops. This prevents water from seeping into surrounding structures, which could lead to long-term damage like rot or mold. Allow the caulk to cure completely as per the manufacturer’s instructions before heavy use.
Advanced Utility Sink Plumbing: Installation Without Existing Lines
Installing a utility sink in a location without existing plumbing, like an unplumbed garage, is a significant challenge best left to professionals. The main difficulties include:
- Extensive Pipe Runs: Running new supply and drain lines through walls, ceilings, or concrete floors is complex and may require structural modifications.
- Draining Against Gravity: If the sink is below the main sewer line (common in basements), a drain pump or sewage ejector pump system is necessary. This is a complex installation involving electrical work.
- Freezing Pipes: In unheated spaces like garages, pipes are at risk of freezing and bursting during Massachusetts winters. This requires proper insulation and possibly heat tracing cables.
Due to these complexities, installing a utility sink without existing plumbing is a job for professionals. A DIY attempt can lead to costly damage and code violations. Our team at Accurate Heat has the expertise for these complex jobs in Franklin, Medway, and surrounding towns.
If you’re facing significant plumbing issues or complex installations, don’t hesitate to reach out. Solve Your Plumbing Issues in Massachusetts With This Guide.
Useful Accessories and Maintenance Tips
Once our utility sink is installed, a few accessories can improve its functionality, and a consistent maintenance routine will keep our utility sink plumbing running smoothly for years to come.
Useful Accessories:
- Faucet Spray Hose: A pull-down or side sprayer makes rinsing large items and cleaning the sink much easier.
- Sink Grid: A grid placed at the bottom of the sink protects the basin from scratches and dents.
- Under-Sink Storage: Shelves or cabinets keep cleaning supplies and other items neatly organized.
- Backsplash: A simple backsplash (tile, waterproof paneling) will protect the wall from splashes and moisture.
- Garden Hose Connector: Some faucets offer an adapter to connect a standard garden hose, which is useful for many tasks.
Maintenance Tips:
- Regularly Check for Leaks: Periodically inspect all connections under the sink for any signs of drips to prevent water damage.
- Clean the P-Trap Annually: To prevent slow drains, place a bucket under the trap, unscrew it, and clean out any accumulated debris.
- Avoid Pouring Grease Down the Drain: Grease solidifies in pipes and causes stubborn clogs. Scrape grease into the trash instead. To understand more about what not to flush, check out Can I Flush This?.
- Run Hot Water: After using the sink, run hot water for a minute to help flush down remaining debris.
- Use Drain Screens: Simple drain strainers catch larger debris, preventing it from entering and clogging the drain lines.
Conclusion
Installing a utility sink is a rewarding project that adds great functionality to your laundry room, garage, or basement. This guide has covered the key steps, from choosing a sink to the crucial details of proper utility sink plumbing, including correct venting and P-trap installation.
While this can be a manageable DIY project, it’s important to know your limits. Complex jobs involving new drain lines, extensive rerouting, or strict adherence to Massachusetts plumbing codes (like the prohibition on S-traps) often require a licensed professional to avoid costly mistakes and code violations.
For expert, reliable plumbing services in Franklin and throughout Massachusetts, trust the experienced team at Accurate Heat. Whether you need assistance with a new utility sink installation, troubleshooting a stubborn clog, or ensuring your plumbing meets all local codes, our skilled technicians are ready to provide honest, timely, and effective solutions. Don’t hesitate to reach out to us for any of your plumbing needs. Contact us for all your plumbing needs.